Sunday, December 30, 2018

Semester Reflection-Video

Projects

Feature News Story


The objective of this project was to find a person in our class to do a feature news story on. It took around 2 weeks to finish. Some challenges I faced when doing this project is that we had to refilm the interviews because the sound didn't work. I learned a lot about editing news stories because this was the first assignment we had like that. I was told to take out B-roll that didn't make sense, and also that the sequencing was good.


News Story


For this project, we had to create a feature news story. It took around a week and a half to finish. While we were filming, we had issues with the camera. Editing was also a challenge because we did not have as much time as we usually do to edit. I learned about natural sound while doing this project. My feedback was that the video was sequenced well.

Class Time

     I have used my time in class efficiently. If I finished my project early, or if I had extra time in class, I would improve my project. I would also start the blog post if I had more time after that. Outside of class, if I needed to work, I would stay during lunch or after school to work on a project.

Strengths and Improvements

     My strengths in video are sequencing and working in a team. I try to spend time on sequencing so it stands out and makes sense. I also can work in a team well, which is important because all of our projects are in groups. I can improve on using natural sound, and using all 6 shots when filming B-roll. If I improve these things, hopefully they can make my projects even better.

ONW Now

For the ONW Now project, my role was anchor. We had to write the scripts as anchors, and then film the broadcast. My group made the Word From the Halls feature story. While doing this project, I learned a lot about the process and roles behind ONW Now, and the work that goes into it. I enjoyed doing this project because it gave us a chance to see if this is something we want to do next year.

Summary

     This semester, I liked doing the ONW Now project and the news stories. If I could do it again, I would use a variety of B-roll, and natural sound. This semester, I learned about news writing and feature stories and how to film and edit them. One goal I want to set is to improve my projects by using different B-roll shots.

Written News Story


The Project 

     I wrote this news story on my feature video about Brooke passing out at homecoming. You can write a news story by using a feature story and putting it unto words using the inverted pyramid style of writing. I created my news story using my video, and writing the story in chronological order. I used the inverted pyramid by putting the most important facts first , and then as I kept writing I got  more specific. I also used quotes from the feature story and used them to help support my story. 

Reflection

     Writing this news story was fun because it was taking the same idea of a feature story, but in a different form. I liked using quotes in the written news story. Some skills I need to work on is being more specific as the story goes on, and using quotes more efficiently. If I did this again, I would keep the inverted pyramid style of writing.

     For my next project, I will use more specific quotes. I will also keep the inverted pyramid style of writing, and make sure to put more specific details at the end of the story. I enjoyed this project, and I learned a lot about news writing while doing it. 

Wednesday, December 19, 2018

ONW Now

The Process

     For this project, our class created our own version of ONW Now. We were split into groups, and each group was either assigned a news story, a sports story, or a feature news story. My group was assigned a feature news story, Word From the Halls. We started by planning our rolls in the group. My role was to help with editing, and writing the trivia questions. Next, we filmed during lunch and imported the videos on to the computer. Then, we started editing. I started by cutting out each question and answer from each interview. Then, I sequenced them so that the clips of the same question were together. After that, Kensie took over editing because I was assigned to anchor. For anchoring, we write our scripts and planned what the broadcast would look like. The next step was a dress rehearsal. We went down to the studio, and everyone was assigned a role such as floor director, audio, tri-caster, teleprompter, and more. They gave us tips on how to anchor, and helped us with our mics. We ran through the broadcast a couple of times, and it allowed all of us to figure out our roles and see what we could do better. The next day, we filmed the real thing. We had to work fast because we didn't have as much time as we did the day before. We only did one run through, and we had some technical problems, but it was easily fixed on post-production.

What I Learned 

     While doing this project, I learned a lot about convergence journalism, and the process of ONW Now. Before this project, I was not sure what strand I wanted to go into next year, but this project made me want to go into convergence or SID. I enjoyed learning about the process behind ONW Now, and all of the roles that go into it. It was cool to see the show produced live, and it has lots of different aspects and all of them have to work together to produce the show. This project was really fun, and I learned a lot about ONW Now. 

Monday, December 17, 2018

Feature News Story-Yearbook


The Process

     For this project, my group chose to report on the yearbook staff. We started by choosing roles. My told was to create the questions and the story. Next, we chose 2 interview subjects and 21 questions for each of them. Our next step was to film the interviews. We had technical problems with the camera and the mic, but we kept trying new settings and we figured it out. The next day, we filmed B-roll. We made sure to use natural sound so that we could use it in our news story. After we were done filming, we started editing. I sequenced my video first, and then added B-roll, graphics, and voice overs. I made sure to leave in some natural sound in the B-roll. 

What I Learned

     While doing this project, I learned a lot of new things about news writing and natural sound. In previous projects, I did not use natural sound, but I used it in this story. I approached this project differently than last time by using natural sound and doing the project quicker than previous ones due to the deadline. It was challenging to sequence this story, but it helped me learn more about sequencing. For the next project, I will film more specific voiceovers and film more B-roll shots. 

Graphic Design Semester Review

Projects

Infographic

     For this project, we came up with an idea for an infographic, and researched it and designed our own. It has taken around 4 weeks, and I am still working on my final design as of now. I faced some challenges when I started on my graphics becauseI was not sure how to use the pen tool, but I learned how to use it as I went along. This project helped me learn how to use the pen tool, and about the process of planning and sketching.  My feedback was that my text to graphic ratio was too big, so I am working on finding a new font for my text to condense it. I made many changes from my original idea, including the Christmas tree in the center of my infographic.

Pop Art


     The objective of this project was to take an original picture and create a pop art from it.  It took me around 1-2 weeks to complete. When I was creating my design, I had many different ideas and it was challenging to find one I really liked. I learned a lot about Photoshop, because I got to create my own design and have creative freedom. I also became more familiar with the tools. Some of the feedback I got was that there was negative space behind the subject, but it was good negative space. My original idea was way different, and I ended up changing a lot of aspects of it, including the stripes and the background color. 


Raccoon

   
     The objective of this project was to create a raccoon using a written tutorial.  This project took me around 1-2 weeks to complete. When I was creating the raccoon, I had troubles with some of the tools and their uses, but I kept trying until I got it. We created this project in Illustrator, and it was our first project using that program, so it helped me become more comfortable with it and learn how to use the tools. Some people liked the bowtie I added, and also I was told to make the raccoon larger on the background. My original original raccoon was the same, I just added a bowtie, but I didn't change any colors of it.

Class Time

     I used my class time well this semester. I tried to work hard and use all of the time given to me in class. When I was done, I would go back to the project and make it better. I also have stayed many times in to Raven 50 this semester to keep working and finish my project. Also, if I needed it, I would work at home on my infographic sketches or a blog post. 

Strengths 

     Some of my strengths in graphic design are creativity and learning the tools quickly. I think that  my ideas are pretty original, and I can come up with new ideas pretty quickly. I also learn the tools and programs pretty fast. While doing the projects, I try to use new tools so I can learn how to use them. I also am strong in communicating with my teacher and peers.


Areas of Improvement

     I think I can improve on  my technical skills. I don't really know how to use most of the tools in Illustrator, and I think if I improve these skills, my projects could be better. Also, I think I can improve on project management. If I work faster, than I won't have to rush and finish it in time for the deadline. This also will make my projects better, because I won't have to rush and make something look sloppy. 

Summary 

     This semester, I enjoyed all of the fun projects we got to do, and how we had creative freedom to make it unique to us. My favorite projects were the pop art and the infographic. Next semester, I will change my project management skills by meeting deadlines, and improving my technical skills to give my projects more detail. This semester, I learned a lot about Adobe Photoshop and Illustrator and their tools. For next semester, my goal is to improve my technical skills. Overall, I enjoyed this semester of graphic design and I am excited to see what next semester will be like. 


Tuesday, November 6, 2018

Printing Project


The Process 

     At the start of this process, I printed two of my designs out on white printer paper, and they were the size 6 by 4. I also made sure to reflect them so they wouldn't turn out backwards on my final print. I then cut the out designs. The next thing I did was watercolor two different pieces of  watercolor paper with the color schemes that were on the designs. After that, I painted the designs front with Mod Podge. I painted enough so that you couldn't really tell what the design wad through the Mod Podge layer. When doing this, you have to work fast so that the Mod Podge doesn't dry. After that, you place the picture face down in the middle of your watercolor. You than take a squeegee and smooth out the picture and press it down. Make sure to not get any Mod Podge on the top of the design because it will later impact your process. After it dries, get some water on your fingers, and rub the paper off of the design. Make sure you don't leave any paper fuzz on the design. Lastly, place a clear coat on top of the design.


My Experience

     During this process, I thought it went overall really well. My prints turned out good, and they had almost no paper fuzzies on it.  If I were to do this again, I would try to not rub off the watercolor. I would keep the same amount of Mod Podge on it, because my print transferred pretty well. I really enjoyed this project, and it was interesting to see how the printing process worked. Overall, this project was really fun to complete, and I thought that my print went well. 


Sunday, November 4, 2018

ONW 1 in 2000


The Project

    For this project, our group had to find a story to report about, going along with the idea of 1 in 2000 (each student has a story to tell). My group decided to do our story about Brooke Cunningham, who passed out at homecoming pictures. We chose this because we wanted a story that had a message along with it, and this ones message was that you can always look back and laugh on embarrassing moments. 

The Process

    My group started out by finding another person we could interview about this topic. We chose to interview Alex Pauli, because he was her date for that dance. Next, we created around 20 interview questions about the topic for each of them. We then began filming. We started with interviewing Alex. The next day, we interviewed Brooke, and also shot some B-roll. While putting the videos on the computer, we realized that our interview with Brooke had no sound, because we had forgotten to use a mic. So the next day, we re-filmed her interview, and everything in that one turned out okay. I began editing the day after that. I started with watching through the interviews, and finding which parts I wanted to use. Then, I sequenced them so that they made sense. Next, I added in B-roll. After that, I filmed voice overs at my house, and put them into the video the next day. Finally, I added background music. 

What I Learned

     During this project, I learned a lot about news writing because this was our first "news" project. I learned about sequencing, voice overs, B-roll, and more. This project also helped teach me about motivation and project management because my group faced a lot of setbacks during it, but we kept going. For the next project, I would do audio checks before filming, and work faster so the video can be done in time. I will follow the same editing process for the next one. I learned a lot doing this project, such as messing with graphics and effects on pictures and video clips, and to make sure to always check your audio!

Tuesday, October 16, 2018

Printing Processes

Relief Printing 

     Relief printing is the process of printing where the ink is transferred using raised images. You start by tracing your design on to material, but backwards because it will be transferred. Next, you use tools to cut out your design and add different textures and patterns. Then, you roll the ink onto the material. You then print it onto paper using a press.

Image result for intaglio

Intaglio Printing

     This process had different printing methods. One is dry point, where different tools are used toscratch the printing plate to create texture in the image called burs. Roulettes also can add texture to the picture. You then add the plate into the press to create your design. The other method is etching. For this process, you prepare the plate by polishing it and making sure it has no scratches. Next, you apply a ground to the plate. Then, you smoke the plate so the surface is jet black. You can then scratch your design in. Next, you etch the plate for 15 minutes to remove all of the copper. Then you take it out of the bath and rinse it, then put it back in. You can then remove all of the ground and apply ink and put it in the press to create your design.


Lithography Printing

Image result for lithography  example     Lithography is printing using water and grease to repel each other and create a design. This process starts with an artist drawing their design onto a stone with greasy material. You then add some chemicals to help the drawing set. Then, you add ink to the stone and design, which is called proving the stone. Next, the stone is placed in the press. This process is repeated until the design looks how you want it to.


Conclusion

     If I were to try one of the printing processes, I would try relief printing. This process stood out to me because I liked the way it looked and how it was created. I think that printing has impacted designers because they can use each process to create a unique piece of art. 

Thursday, October 11, 2018

Panorama Narrative


Narrative

     I went to Estes Park, Colorado over spring break 2018. We drove to our house that we were renting, and on the way we saw lots of mountains and cool landscapes. As soon as we got to our house, we went to the backyard. The backyard had a really cool river that ran through the back of the house. You could hear the water rushing, and it was very pretty. Later that night, we went to dinner. Estes Park is a smaller town, so we chose a local Mexican restaurant. Behind this restaurant was some trees and snow, and below the trees was another river.  It had rocks in it, and it was fun to watch the river flow over the rocks and create waves and different textures in the water. We then went back to our house after eating, and prepared for our hiking the next day.

     The next day, we went hiking in the Rocky Mountain National Park. We went on a super long hike first to a lake that was frozen over. On the way there, we saw lots of trees and rocks that were super big. They were fun to climb on and when you got to the top of some of the big rocks, you could see over the trail we were walking. When we were there, we also went to a waterfall that was frozen over. This was my favorite experience from the trip because the waterfall was frozen over, but under the ice you could still hear and see the waterfall rushing. Since the waterfall was frozen over, we got to slide down it. It was really fun to slide down, because it was really tall so it was like a giant slide. Since we were done at the waterfall, we walked a little bit more and climbed up a big rock to get to the top of it. Once we were at the top, you could see so many mountains, and it was really pretty.

     Towards the end of our trip, me and my dad went and toured the Stanley Hotel. This hotel was the inspiration for the movie The Shining. The tour was cool, but a lot of their tricks were very obvious. The hotel gave me an uneasy feeling because it was an older hotel with some weird vibes. We spent the last few days shopping on the main street in Estes Park. We bought a lot of taffy, because there are lots of taffy shops in Estes Park. The taffy is really sweet, and my favorite flavor is strawberry. Estes Park also had really good ice cream. We ended our trip by taking one last hike, and then we started on our way home.

Reflection 

     My theme was nature, and more specifically Estes Park. I wanted to show the cool pictures I took in Colorado. The pictures don't really do it justice, but it was cool to try to combine them into one big picture. I learned more about Photoshop tools, such as the eraser and feather tools. I used the eraser, clone stamp, and I changed a lot of the brightness and contrast on some of my pictures. It was a really fun project because it allowed me to be creative, and I learned a lot. 
   

Wednesday, October 10, 2018

ONW Procedures Video


     For this project, our team had to choose a procedure at ONW to create a video on to show how the procedure should be done. My team chose seeing teachers during Power 50. We originally wanted to do a different idea, but we felt that this one was more important, because there is a new program to assign students for Power 50, and we wanted to show that. We thought our idea was original, and could easily be portrayed. During this project, my role was Director. I helped lead my team and keep us on task.

     During pre-production, the first thing we did was share our ideas with each other for the video. We made sure to incorporate everyone's ideas, and compromise if needed. Using these ideas, we created a very basic outline of what we wanted the video to look like. Next, we brainstormed things that we would want to include, or even exclude. For example, we decided to cut out excessive walking, and instead use our time of 30 seconds to include some more important shots. Our next step was to create a list of each shot, and the details of it, such as the type of shot and what was happening. This helped us write our script and storyboard, which we ended up doing at the same time to avoid inconsistency. After we completed pre-production, we were ready to film.

     My team filmed for 3 days. The first day we got a few shots, but we ended up not using them. The second day, we filmed in the library for half the time, and then filmed in the classroom. Finally, the third day we shot the scenes where the actor goes back to see his teacher during Power 50. While we filmed, I learned a lot more about the camera than I did before. My team spent almost all of the first day of filming trying to set the camera up right, and learn its functions and what they do. When we filmed, we got multiple shots of each scene so we had some to choose from. Our filming process went great, and it helped me learn more about the cameras.

     After filming, my team edited the video. I started by putting the clips in order, than making cuts and trimming them. Once this was done, I added effects, such as fade to black, or blurring the background in the screen capture of the email. I added music that was a good tempo, it didn't go too fast and it wasn't too slow. I learned about new effects for Premier Pro, and it helped me improve my skills for the next project.

   Overall, I enjoyed doing this project because it challenged me. It was our first project using a new camera, and I had to refresh on my editing skills. If I could do something different, I would slow down the ending to my video because it went too fast. I would keep the beginning because I thought that part was the better part of the video. For my next project, I know how to use the camera and more skills in Premier Pro.

Friday, October 5, 2018

Photoshop Pop Art


     For this assignment, we took pictures of other students in our class, and created pop art. During class, we learned about different artists who created pop art, and their different styles. I incorporated Warhol and Lichtenstein's styles by using bright colors, outline, and repeating shapes. I liked the way they changed the colors, and wanted to use some of their ideas in my pop art. 

     My picture had a color scheme of mostly blues, with a little bit of yellows and pinks. It was also a cool colors scheme. I wanted there to be a lot of colors, but still be able to tie into each other. I began creating my design by cutting out my subject and creating a mask so that there was a background. Then, I played with the different shapes and found the lines which I liked, so I included those. I also included a gradient shadow behind the subject, because repetition was a main focus in pop art. On my subject, I applied a photoshop filter that has dots on it, which was another aspect of pop art. I also added a gradient in the shape of my subject, and used it as a shadow. On the left side of my pop art, I included a line of squares that were turned on its side. This was repeating shapes, another aspect of pop art. I also repeated the long rectangles coming from the corner. I also used a special brush tool that allowed me to do a pint splatter, so I incorporated that as well. Finally, I outlined the subject an the gradient using the white brush tool. I wanted it to be more free hand, and look a little more messy, because pop art is not always crisp, clean lines.

     During this project, I learned a lot about using Photoshop, and it challenged me because I had to be creative and use my own ideas, while also incorporating pop art requirements. I enjoyed creating this project, because it allowed me to try new tools, and experiment with different colors, shapes, blending modes, and filters. If I were to do this project again, I would try using a different color scheme, and try to make my project more detailed. Overall, I really enjoyed this project, and it helped me learn a lot about Photoshop. 


Thursday, September 13, 2018

Photoshop Challenge 1


Photoshop Challenge 1

     I created an edited version of the given picture in Adobe Photoshop. When I first opened the picture, I had a few ideas, but I originally started on the fire idea. After creating it, it didn't look how I wanted it to, so I started creating some of my other ideas, which was sand and water, and a sky theme. I eventually decided to go back to the fire idea I had originally had. When I put the fire in the background, I thought it needed more, so I looked for a picture of smoke to use for his jacket. There were no pictures of smoke that looked how I wanted it to, so instead I used a picture of dark clouds. I also changed the color of the fire and added some more red to bring in some warm colors. The end result turned out good, but I wish I could have done something to his hair to improve the project. 

     In my project, I incorporated layer masks, blending modes, and adjustment layers. I used a mask on the jacket, so it would fit the jacket perfectly. I also turned down the opacity so you could still see a little bit of the texture and the wrinkles on the jacket. For the fire, I blended the black background it originally came on, and then painted on a layer mask to hide some of the extra parts that did look exactly right. I used the blending mode linear burn on the fire to darken it. I chose it because it had a cool effect on the fire. The adjustment layers helped me change the color of the fire by using a hue/saturation layer. Overall, I learned a lot of new uses for tools by using them for my project. 


Thursday, August 30, 2018

Graphic Design Tutorials


Tutorials

     I created and edited images using Adobe Photoshop this week. I learned a lot from these tutorials because I was not very skilled in Photoshop before, but now I know how to do certain things and use specific tools in Photoshop. I learned about the uses of the clone stamp, the healing brush, content aware fill, and many other feautures. I also learned lots of helpful keyboard shortcuts that can save me some time while working. I can incorporate these skills when I run into a problem with a photo.

     Before completing these tutorials, I did not know  alot about Photoshop. I just knew the basics functions from last year. These tutroials helped me understand how to use Photoshop better, and made me more comfortable with its features. Some of the tutorials were harder than others, but overall I think the hardest one was the girl in black. It had many different steps and components that were essential to the process. I felt way more comfortable using the program after completing a tutorial that challenged me. Overall, I think these tutorials helped me gain confidence in Photoshop, and helped prepare me for future projects.


Self-Portrait

Self-Portrait

Describe

     In my self-portrait video, I chose to represent myself by filming a video about my dog, and the girl I babysit.What I wanted to show about myself was that I like dogs, and I also like kids. Most of my time is spent with my dogs. I also wanted it to give a playful vibe. Other peoples self-portraits that made me laugh inspired me to make one that was more playful. It helped show their personalities better and showed us more about them. 

Explain

     Some of the elements of my self-portrait was lighting and slow motion. I was outside so we had good natural lighting. I also filmed the whole video on the slow motion feature of my phone, and then just chose the part that I wanted to slow down. I used the slow motion feature because we were throwing a tennis ball for my dog, and it was to show her trying to catch it in her mouth. The slow motion part was funny, because the dog missed the ball, which contributes to the fun vibes. Next time, I can improve on including more interesting parts in the video, because some parts were a little boring.

Reflect

     When people watch my video, I want them to see a fun and carefree side of me. I think I was succesful in acheving this, because my video was not scripted and it was a fun "topic". When I created my self-portrait, I had the challenge of coming up with an idea. I finally decided on my video idea because it was just a "day-in-the-life" essentially, and it was more real than a script could have been. My favorite aspect of my self portrait was the slow motion part, because it gave a new twist on my video. Overall, I learned a lot during this project, and it helped me portray myself to my classmates.

Tuesday, May 22, 2018

Final Reflection


The Project

     For our final project, we had to create a new, innovative product, and use graphics to promote the product and pitch it to an audience. My team created the product Flare, which is a rechargeable, heated coffee cup with adjustable temperature. We started the project at the beginning of fourth quarter, and it took about 9 weeks. my team disagreed on some things, but we compromised and used everyones ideas. I learned a lot about teamwork and collaboration, and also things about design and graphics. we were given some feedback on our presentation, so we made our presentation flow more. I think that my team worked well together and had fun, and I think our project ended up being pretty good.

 What We Made     

     My team stayed productive during this project by looking at due dates and deadlines, and seeing when things needed to be done, and then splitting up the tasks so it would get done faster. Our team had to create a website for the project, along with other graphics, and a commercial. The website was mainly done by one person, and all of the graphics were created by the other people on the team. I created the web banner, the mascot, the word mark, and the animated ad. The commercial that is embedded is my commercial, but we did not use it for our website. There was also a coupon, and all of these are shown above. If we finished our part, we would help our teammates if they needed it. We also communicated outside of class to make sure we had everything done, and to communicate important information.
     

Strengths and Weaknesses

   I think my strength in e-Comm is graphic design or video. I can be creative and create different things. I am also better at using the programs for these two areas. The areas where I struggled were animation and web. I am not good at using Dreamweaver and Sketchup. 

Conclusion

     During this quarter, I liked rotating classes because it gave you a chance to try everything and meet the teachers. I also liked creating our own logo because we had freedom to create whatever we wanted. If I could change something, I would want to have the projects build off of each other. I learned a lot of new things this year, and how to use many new programs that I had never used before. Next year, I want to improve my skills and make new projects.  this year was really fun an always enjoyed going to class. 


Tuesday, March 6, 2018

CSS and CARP


Overview 

      For our quarter 3 web project, we re-designed a poem about a dog. I used Adobe Dreamweaver to create my project. The HTML file was changed using the CSS designer. You can change the properties of the different components in the program.  The two attached pictures show the before and after of the HTML files.

Contrast

     I changed the color of the title, so it was different than other parts of the project. The font in the title was also changed. In the first paragraph, the very first line was bolded to create contrast. The background was also a different color than the other background. 

Alignment

     The poem was aligned to the right, while the picture of the dog was to the left. The title was center aligned to show it was important. This made the project look more organized.

Repetition 

     The color of the title matches part of the dog's fur. This color appears again at the bottom of the screen and also at the top. Th lighter background color was also repeated from the dog. 

Proximity

      The poem was grouped together because the color was the same. The dog was in its own group to the left. In the title, the color was the same so it was its own group. 


Conclusion

     During this project, I learned a lot about CSS Designer and web design. I learned how to change the properties in CSS. I also learned more about Dreamweaver because I haven't used it a lot. It is interesting to see the way the file changes if you change the code or the properties. It was fun to learn how to create HTML files in Dreamweaver, and using the CSS designer. 


Monday, February 26, 2018

House Project

Used for the brick posts at the front of the house.
Used for top part of the front roof, changed to blue color.


Overview 

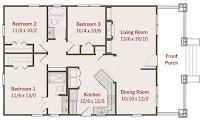
     For this project, we picked a house from houseplans.com and we created it using SketchUp. We had to include custom textures from online. We had to create windows and the door, and the other details. This project was fun to do because we got to create the house that we picked. I also learned a lot of new things about SketchUp.

How it Went 

     During the project, I restarted my house because the roof was too intricate, and I was struggling with the shape. Once I picked a new plan, it was super easy to do, and I liked making all of the details. I created the door and the windows easily, and I experimented with the different kinds of textures. My house turned out more narrow than the picture. Overall, my house was fun to create. 

What I Learned 

     I learned a lot about Adobe SketchUp during this project. I did not have a lot of experience with it before this project, so that was kind of a challenge. The tools were confusing at first, but after I used it more, I learned what they were for and when to use them. I liked picking my own house and getting the freedom to make it how I wanted. This project helped me learn a lot of new things about animation and SketchUp, and it was really fun to do. 

Sunday, February 11, 2018

Bounce

Bounce

     I created three bouncing ball animations using Adobe Photoshop. The first animation was a ball bouncing straight up and down. The next animation was a ball bouncing in from the corner of the screen. For the third animation, you had to create your own animation. Mine was a ball bouncing across a screen, and then it fell into a hole. 

     To create the ball animation, we used Adobe Photoshop. I created the sky and the grass, and then the ball. I animated it by creating copies of the ball and spacing them so it looked like it was bouncing. I did the same process for the other animations but just spaced them out more. For the third animation, I added a hole at the end and made the ball fall into it.

     During this project, I learned a lot about animation and Photoshop. I had not done anything with animation before, so it was interesting to see the process. I had never used Photoshop either, and I enjoyed learning about all of the new tools and what they do. I had some trouble with the speed of the ball, but I learned how to fix it. This project was fun to create because I learned how to animate and learned how to use a new program.


Sunday, February 4, 2018

My Personality Type


     My personality type is ESFJ. People with this personality are supportive and helpful. Some call this personality "The Provider". They pay attention to other peoples needs and emotions and want to please and provide. Family and friends are one of their top priorities. William McKinley, Nancy Kerrigan, and Martha Stewart are all ESFJ's.

     I think that this type describes me pretty well. I pay attention to other peoples emotions and want to help other people. ESFJ's also plan ahead of time and are organized. I am not the most organized person, and I don't really plan things ahead unless it becomes too overwhelming. This personality type also follows through with what they do, and I always try to finish what I start.

     Learning more about my personality has explained more about me. I have always cared about peoples emotions and wanted to help people around me. Some say ESFJ's like entertaining people, and that might be why I like cheerleading. The E in ESFJ stands for extraverted, and I like to be with my friends or family when I have extra time. I want to work in a field that helps people, which is a characteristic of ESFJ's.

     When I work in a team, I want to help lead, but also make sure everyone is feeling good about what they're doing. I also want the group to work together. This is a characteristic of ESFJ's, they want harmony and cooperation around them. If the role I need to fill matches my personality, then it will be easier to do what I need to. If it does not match my personality, then it might be hard to not "organize" everyone to make sure they are satisfied.

     In the past, my friends might have misunderstood that ESFJ's want to please everyone. For example, I might say what someone wants to hear, even though it wasn't what I agreed with. I usually get along well with others, but get a little upset if someone doesn't respond to me trying to be friendly, which could be misunderstood. I also enjoy getting to know someone and remembering small details about a person. Sometimes people get annoyed when I ask for their opinion when I make decisions, which is the F(feeling) part of the personality.

     After I took the quiz and looked into my personality type, I could agree that I have a lot of the characteristics mentioned. As I kept reading and writing more about my type, I realized that a lot of the things that I do are based on different parts of my personality. I think I have learned a lot about myself and why I do things. It was interesting to see all of the different characteristics and traits that I didn't notice until now. I learned a lot more about myself and my personality while doing this assignment.

     For my animal personality test, I scored a 21 in Column 1, a 60 in Column 2, a 31 in Column 3, and a 15 in Column 15. This means I'm an otter. Otters are very social and they like to motivate and influence others. They are a people person and are positive. I think that this personality fits me pretty well. Some of the aspects of it don't fit me, but overall it is pretty accurate.


Video Semester 2 Reflection

Short Film      For this project, we had to create a short film using our own scripts. We started the project by pitching script ideas to...